
In MONOMOON, the Red Temple houses nine intricate puzzles that test your grasp of the game’s number symbols and pattern recognition. You’ll find the challenges require exploring hidden clues scattered throughout the rooms as you navigate. Preparation is key, so take the time to familiarize yourself with MONOMOON’s unique number system—you’re definitely going to need those insights to unlock each puzzle!
Map Guide: Coordinates & Numbers
Red Temple Guide: 9 Puzzle Codes & Solutions
The solutions to the puzzles are laid out in the order you’ll encounter them. Each puzzle starts with helpful hints that illuminate the mechanics before you dive into the answer. Don’t worry if you need just the specifics—a complete code for each hurdle is included too.
Finding the Red Temple
Your adventure begins by locating the Red Temple entrance at coordinates (15,08). Be on the lookout for the temple’s outline as you explore the area; it’s a bit tricky to find at first.
To start the entrance puzzle, head over to coordinates (13,07).
Hints for Reaching the Red Temple
- Hint 1: There are two entry points. One is blocked but appears to offer a shortcut, while the other has a lift you can utilize.
- Hint 2: Pay attention to where the lift travels. Ponder whether you can reach that place without releasing the left mouse button (LMB).
- Hint 3: Consider what may occur if you do let go of the LMB instead of keeping it pressed the entire time.
Red Temple Entrance Solution
The moment the lift is fully operational, teleport quickly to the save point at (13,05). Move up a screen and hop onto the lift before it departs—this way, you’ll soar up to the Red Temple.
Opening the Red Temple Door
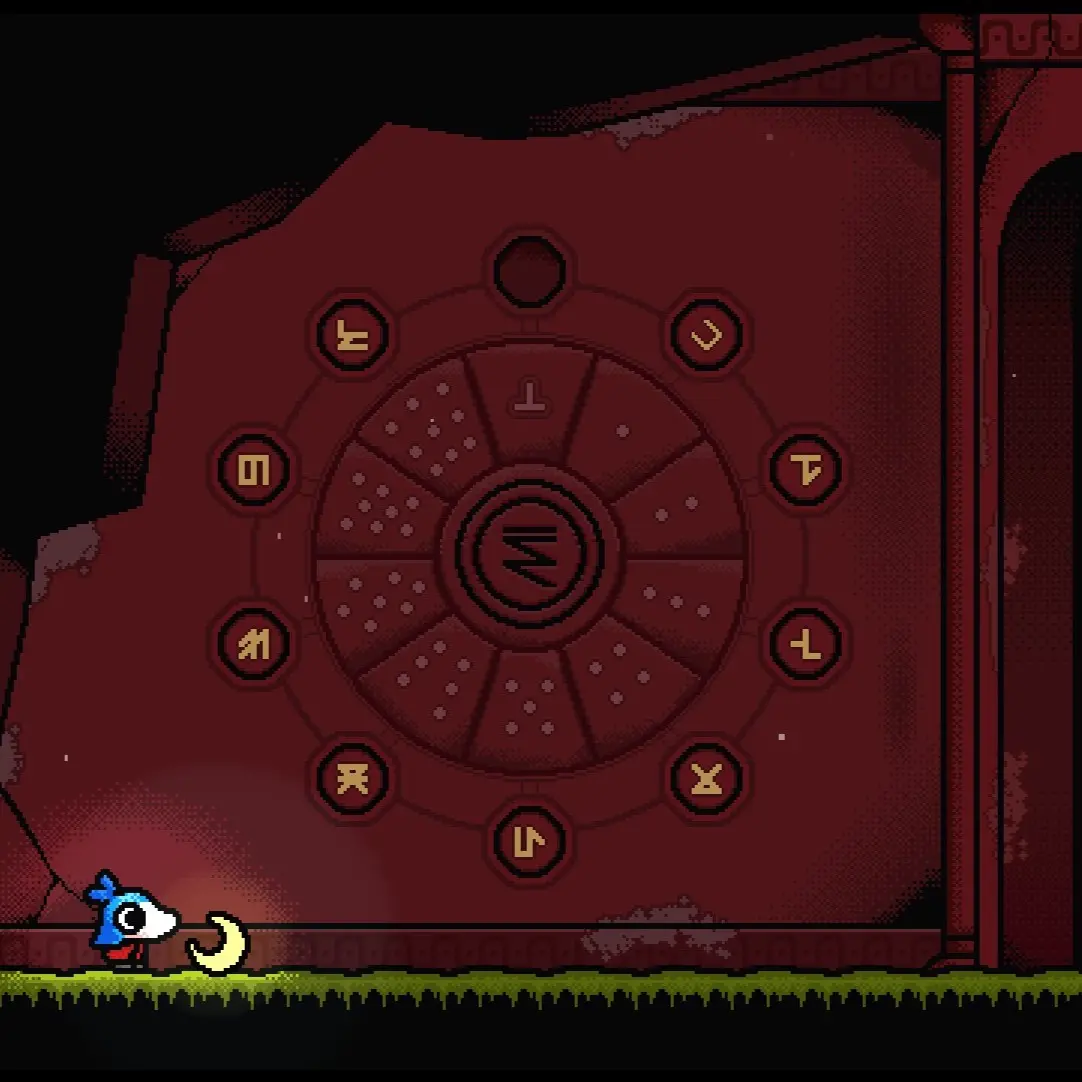
At the main entrance, there’s a wheel displaying unfamiliar symbols. If you still don’t grasp what the symbols signify, it may be wise to learn more about MONOMOON’s numeric system first.
Door Puzzle Hint
These symbols are representations of numbers. Understanding how counting works in MONOMOON can unravel the combination you need. The count of dots will guide you to identify each symbol.
Red Temple Door Solution
Unlock the door by rotating the symbols until they align in clockwise order from 0 to 9, using the dot tally to help you spot the right numbers. Refer to the image for the precise arrangement you need.
Red Temple Puzzle 1 Solution
For the first puzzle, understanding the symbols as unique numbers is crucial. The chalk drawing on the wall serves as a key clue for calculating the combination.
Puzzle 1 Hints
- Hint 1: Treat the combination as three separate digits instead of a single three-digit number.
- Hint 2: The chalk drawing reveals that each horizontal line equals 1.
Puzzle 1 Code
Count the horizontal lines in each figure—you’ll plug these totals into the combination.
Solution Code: 503
Red Temple Puzzle 2 Solution
The second puzzle utilizes circle positions to derive a numerical solution. Instead of counting the circles directly, focus on their arrangement.
Puzzle 2 Hints
- Hint 1: The chalk drawing indicates a value of 0. Examine which counts yield that result.
- Hint 2: Compare the arrangements of the circles, particularly their horizontal positioning.
Puzzle 2 Code
Calculate the differences on the x-axis, which means finding the left-to-right distances between the circles. Summing those differences leads you to the answer.
Calculation: 1 + 2 + 2 + 1 + 2 + 2 + 2 = 12
Solution Code: 12
Red Temple Puzzle 3 Solution
In the third puzzle, the focus shifts to lines within figures and the clues offered by the buttons. The chalk drawing will also outline what to count.
Puzzle 3 Hints
- Hint 1: Investigate the three buttons and look for anything that stands out.
- Hint 2: The chalk drawing states it has a value of 2, which hints at a specific feature appearing twice.
- Hint 3: Assume symmetry applies to the second figure when deducing the answer.
Puzzle 3 Code
Count the intersecting lines in each figure. With the second figure’s symmetry in mind, the total will be 16, calculated as 8 × 2.
Solution Code: 616 (6 and 16)
Red Temple Puzzle 4 Solution
The fourth puzzle showcases four distinct figures and four buttons. Your task is to identify the concealed number within each design rather than counting the lines themselves.
Puzzle 4 Hints
- Hint 1: Analyze all four figures to discern their similarities and differences; some shapes might be familiar.
- Hint 2: Keep in mind that each of the four figures could correspond to one digit of the final code.
Puzzle 4 Code
Each figure hides a number in a square. Identify those hidden numbers and input the four digits in sequence.
Solution Code: 5297
Red Temple Puzzle 5 Solution
In the fifth puzzle, comparisons between pairs of symbols across three columns are essential. The trick lies in applying specific logical operations to their segments rather than viewing each as full numbers.
Puzzle 5 Hints
- Hint 1: With three columns and three buttons, assume each column yields one digit of the combination.
- Hint 2: Sketch the two symbols from each pair side by side, sorting their matched and unmatched segments to grasp the differences.
- Hint 3: A logic gate must be applied to the symbols to identify the resulting number.
Puzzle 5 Code
Utilizing the XOR logic operation, I keep segments unique to one symbol while discarding shared segments during comparisons.
Using this process on all three columns discloses the combination.
Solution Code: 357
Red Temple Puzzle 6 Solution
The sixth puzzle may appear formidable since part of the mural is absent. Still, you can complete it without that piece by applying a method you’ve learned.
Puzzle 6 Hints
- Hint 1: You don’t need to locate the missing segment to finish the puzzle.
- Hint 2: This puzzle is solved with the same strategy as an earlier one; just expect an additional challenge with missing info.
Puzzle 6 Code
Approach this puzzle like Puzzle 4. Identify the concealed number within each figure, despite the incomplete mural.
Solution Code: 64
Red Temple Puzzle 7 Solution
The seventh puzzle demands careful scrutiny of the wall and comprehension of how overlapping number symbols affect the outcome. The highlighted lines and adjacent buttons are both integral to the answer.
Puzzle 7 Hints
- Hint 1: Start by illuminating the wall to uncover more details.
- Hint 2: Analyze the figure for potential number symbols you could incorporate.
- Hint 3: The three buttons indicate which digit correlates to each highlighted line. For instance, the line at the top relates to the second digit.
- Hint 4: Experiment with combining identified numbers to see if their lines can recreate the original figure.
Puzzle 7 Code
Determine the three number symbols that can be composed to rebuild the original figure. Each number must utilize a highlighted line, which also dictates the final code order.
Solution Code: 523
Red Temple Puzzle 8 Solution
In Puzzle 8, figures comprise triangular cells marked with varied dot counts. To decipher the code, connect those dots to the lines of the game’s number symbols.
Puzzle 8 Hints
- Hint 1: Illuminate the wall prior to scrutinizing the figures.
- Hint 2: Observe why some triangles show one dot whilst others display two.
- Hint 3: The missing element in the third figure isn’t required to solve the puzzle.
- Hint 4: Experiment by sketching various number symbols within the figures and verify whether the dots correlate to those lines.
Puzzle 8 Code
The dots indicate how many lines of a number symbol touch each triangular cell. By aligning the dot counts with the lines in the grid, I can identify the trio of numbers needed.
Solution Code: 097
Red Temple Puzzle 9 Solution
The ninth puzzle stands apart from the rest. It doesn’t call for another standalone number pattern; rather, it requires drawing on information from earlier puzzles you’ve tackled.
Puzzle 9 Hints
- Hint 1: Remember that this puzzle deviates from most of the previous challenges.
- Hint 2: Use a light on the wall to uncover additional clues.
- Hint 3: Examine the buttons for anything unusual.
- Hint 4: Take a look at the three rectangles of varying widths that interact with your Moon; their shape should remind you of something else in the room.
- Hint 5: Open your map and search for a similar layout or pattern.
- Hint 6: The three large squares represent the solutions to previously completed puzzles in the temple.
Puzzle 9 Code
The three squares correspond to Puzzles 4, 5, and 6 on the second floor. Use the right digits from their solutions and arrange them in the required order to complete the final code.
Solution Code: 9374