
The Sheer Guts achievement in Annihilated can be quite a challenge, especially during the final boss fight for the Mage Ending. Players often struggle with the intense damage from the Priest while trying to deal enough damage to finish things off. This one caught me off guard; I found that pairing the Domination Staff and Copy Rod really lightens the load.
Many players waste precious resources trying to beat the Priest too quickly. The key is patience—building up your damage and defense is crucial. I spent a lot of time figuring out the best approach, and I want to share that with you so you don’t make the same mistakes I did!
Before diving into the strategy, make sure you have the right upgrades and items. Specifically, focus on those which will maximize your ability to control the fight while stacking damage.
To achieve the Mage Ending, you’ll need to make a couple of very specific choices during the game. These choices set the stage for your battle against the Priest.
Required Choices for the Mage Ending
You should prepare the following items before fighting the Priest.
1. Domination Staff
This will be your primary weapon for the initial turns. The Domination Staff allows you to attack twice, making it perfect for managing the tentacles early in the fight. You only need two hits, so with good timing, you can control the battle effectively.
- Your attack hits don’t consume your attack count.
The main goal is to build up Dominate on the tentacles before dealing with the Priest.
2. Copy Rod
This item is key for building significant Strength during the later parts of the fight. The Copy Rod excels in transferring its attack power, especially when it breaks and creates a stronger version of itself. Because attack hits do not consume attack count, you can build up a lot of Strength quickly.
- Combine it with an item that has a high number of uses, or one with a multi-hit effect.
3. Fake Sword
Though optional, the Fake Sword improves your chances of surviving the final phase. It allows you to take control of a weapon right when you need to stop the Priest’s lethal attacks. If you have other breakable items, you can skip this.
4. Puppet String
Another good option if you don’t have the Domination Staff. It works well with multi-hit weapons and helps maintain attack momentum. Upgrades aren’t necessary, but it can also attack twice.
- When it breaks, it creates a stronger version of itself.
Unlike the Copy Rod, it doesn’t have to come with a multi-hit effect to be effective.
5. Soul-Slinging Stone
This item is not mandatory but makes using the Domination Staff easier. You don’t need to allocate upgrades, as they won’t enhance its role in this strategy.

First to Third Turn: Build Dominate
Start the fight by using the Domination Staff on the tentacles. Hitting specific spots shown by the attack pattern is essential. After your actions, be ready to either use defensive maneuvers or take on the incoming attack of 104 damage.
- If you have three hits available, use them to attack all the tentacles; just remember that attack hits won’t count against your limit.
Keep applying Dominate until you reach Dominate 3. At this point, you can either strike to break the Priest or apply more Dominate to any surviving tentacles if the opportunity arises.
Fourth Turn Onward: Build Massive Strength
Switch to the Copy Rod once you’ve finished setting up Dominate. Focus on targeting the limbs while they gain Strength. Each hit with the Copy Rod can net you up to 50 Strength if it has multi-hit effects, which is where it shines.
Keep building Strength until you reach at least 325 damage to deal with the final phase.
- Depending on your Dominate, decide whether to eliminate the limbs or leave them alive.
- If you know the third phase is coming, prepare with All-Out Support.
Make sure not to rush the final phase until you’re confident in your Strength.
Best Items and Upgrades
Before you dive into that epic showdown with the Priest, it’s essential to get your gear lined up. Make sure you’ve gathered these key items to set yourself up for success.
1. Domination Staff
Your trusty weapon for the initial three turns will be this gem right here:
The Domination Staff is a game changer, allowing you to strike twice. This is fantastic for keeping those pesky tentacles in check right at the start of your battle.
- You’ll find that you only need to land two hits, or if you’re clever with your timing, you could even use two staffs.
- No worries about your attack count either; those hits won’t take away from your overall attack limit.
As you face off, your key focus should be on building up Dominate on those tentacles before you go all out on the Priest.
2. Copy Rod
This will be your go-to weapon for ramping up your Strength, so keep it handy!
When you’re diving into the later stages of the fight, keeping the Copy Rod handy is absolutely crucial. It’s like your trusty sidekick, ensuring you have what you need to take on the challenges that lie ahead.
- To get the most out of your Copy Rod, make sure to combine it with an item that has a lot of uses or one that naturally hits multiple times. This way, you’ll maximize your efficiency and effectiveness in battle.
- On breaking, the Copy Rod will surprise you by generating a fresh copy of itself, and here’s the kicker: this new version will pack an extra punch with its effect being boosted by 1!
- Another cool feature is that your attack hits won’t chip away at your total attack count. So, swing away without worries!
You’ll find that by consistently attacking the tentacles, you’re not just dealing damage but also building up a formidable amount of Strength. It’s a fantastic way to power-up by just keeping the hits flowing.
3. Fake Sword
The Fake Sword isn’t a must-have, but it definitely adds an extra layer of safety during the final phase of the encounter. It’s like having a backup plan to help you navigate through the tougher parts.
This nifty item is designed to latch onto the Stealable Weapon’s Bar. Why? Well, it allows you to grab a weapon at just the right moment to put a halt to the Priest’s relentless attacks. It’s all about timing and strategy!
If you’re already equipped with other items that can be broken to snatch a weapon, you can totally give this one a pass. There’s no need to double up if your inventory is already well-equipped!
4. Puppet String
If you find yourself not equipped with the Domination Staff, don’t fret! Puppet String is a fantastic alternative that can really come in handy.
- No upgrades are necessary for this one!
- It’s best to pair it with a weapon that can hit multiple times.
- It has the capability of executing two attacks.
- And here’s a cool trick: when it breaks, it generates a new copy, but with its effect power boosted by 1!
The great thing about Puppet String is that, unlike the Copy Rod, it doesn’t require the multi-hit effect to be something that comes built in. You can make it work with other strategies seamlessly.
5. Soul-Slinging Stone
This item isn’t mandatory, but it can certainly ease the use of the Domination Staff. If you’re looking for a smoother experience, consider giving it a try!
There’s no need to waste any upgrades on this item since they won’t really enhance this particular strategy in a meaningful way. So save those upgrades for something that will really count!
Annihilated Sheer Guts Strategy
When you’re all set with your gear, make sure to follow these steps during the intense Priest boss battle to maximize your chances of victory.
First to Third Turn: Build Dominate

Kick off the battle by wielding the Domination Staff against those sneaky tentacles. It’s the perfect way to start building up your dominance in this encounter!
- Be sure to target the exact spots revealed by the attack pattern — they’re your best friends in this fight.
- After your strike, you can either activate any defensive maneuver or just brace yourself for a hefty 104 damage incoming. The choice is yours!
- If you find yourself with three strikes ready, why not let loose on all the tentacles instead? Just a heads up: attacking won’t use up your attack count!
Keep the pressure on by continuously applying Dominate until you manage to reach Dominate 3. This long-term strategy is key to setting yourself up for a strong finish!
When you finally have enough Dominate built up, it’s time to strike back and break that Priest. If any tentacles are still hanging on, don’t forget — you can add more Dominate to them if you see a chance!
Fourth Turn Onward: Build Massive Strength
After you’ve got Dominate all set up, switch over to the Copy Rod. This transition is essential to keep your momentum going!
Your next focus should be on those limbs while they’re busy gaining Strength. Keep the pressure on with the Copy Rod to bolster your own Strength, making sure you stay ahead in the battle!
If your Copy Rod is packing some multi-hit power, brace yourself because you can rack up a whopping 50 Strength for each hit! This is truly where the weapon shines and becomes a force to reckon with in battle.
It’s crucial to keep stacking that Strength until you’ve reached a level of damage that’ll see you through the final phase without breaking a sweat. Don’t underestimate this step, as it can really determine how smoothly the encounter will go!
- Based on your current Dominate level, make the call on whether to take out the limbs or keep them alive for now. That tactical decision can change the game.
- Make sure your Strength is pumped enough to hit that benchmark of at least 325 damage in the third phase!
- If you sense that the third phase is looming just around the corner on your next turn, don’t hesitate to activate All-Out Support to get yourself prepped and ready.
Take your time before diving into the final phase. Ensure you’ve got enough Strength secured. Rushing can lead to unwanted surprises, and we want you to come out on top!
Third Phase: Deal 325 Damage and Finish the Fight
When you hit the start of the third phase, your first mission is clear – you need to unleash 325 damage right from the get-go. This is your chance to make a solid impact!
Once you’ve landed that essential damage, it’s time to grab a weapon using the Fake Sword or another item at your disposal. This step is vital since the Priest will keep hammering you with that brutal 999 damage attack, and you need to be ready for it!
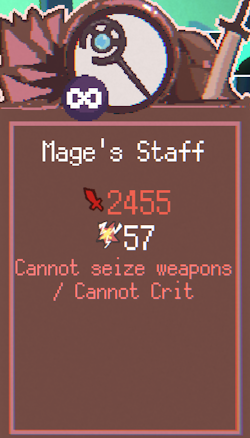
After you’ve successfully dealt with the immediate danger, it’s time to unleash your most powerful attack to bring the battle to a victorious close.
Make sure to strike whenever you have the opportunity, as the Priest will keep unleashing that pesky 999 attack move on you, so stay on the offensive!
If you’ve set everything up just right and have pumped up your Strength sufficiently ahead of time, you should be equipped with all the firepower necessary to wrap up the encounter and gain access to Sheer Guts.