Physical Address
304 North Cardinal St.
Dorchester Center, MA 02124
Physical Address
304 North Cardinal St.
Dorchester Center, MA 02124

Want to climb higher on the Score Attack leaderboard in MHA: UNITED SURVIVAL? This guide will help you understand how the stage works, what you should prioritize, and how to save as much time as possible on each wave.
The biggest thing to understand is that Score Attack is heavily based on speed, but there is also a lot of RNG involved. You won’t necessarily get your personal best every time you play. Sometimes the spawns are simply terrible, your skills don’t line up, or you get unlucky with the route.
That’s completely normal.
The goal is to keep running the stage until you get that one perfect combination of good spawns, good skills, and clean movement.
Score Attack is heavily time-based.
The faster you clear the stage, the higher your score will be.
Because of that, you shouldn’t approach this like a normal stage where you carefully clear everything before moving on. Your priority should be speed and efficiency.
Every second matters.
Movement speed, knowing where to go next, and getting your skills online quickly can make a surprisingly large difference in your final score.
For this stage, the character I recommend prioritizing is:
Iron Sole Deku, the new RES Deku, absolutely destroys this stage.
If you’re specifically trying to push your Score Attack score, this is the character I’d prioritize.
His skills are extremely useful for clearing large numbers of enemies quickly, which is exactly what you want in a time-based stage.
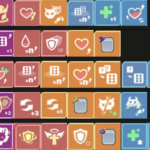
Your skill choices are extremely important in Score Attack.
When you’re offered new skills, I recommend prioritizing them in roughly this order:
The main goal is to get Deku fully online as quickly as possible.
At the same time, you want your abilities to become available more frequently and cover as many enemies as possible.
The better your AOE coverage and cooldowns are, the less time you’ll spend dealing with enemies manually.
This is where your first little gamble begins.
As soon as the skill-selection screen disappears, immediately choose a direction:
UP or DOWN.
The interesting part is that you can actually start moving before the wave officially begins.
If you guess correctly, you can save around 1–2 seconds.
That might not sound like much, but remember that Score Attack is based around time. A couple of seconds saved here can contribute to a much better overall score.
At some point during this wave, large red circles will appear.
Don’t stand inside them.
Run past them as quickly as possible.
If the circles activate while you’re standing on them, you’ll receive a slow debuff, which can completely ruin the time you’re trying to save.
So when you see the red circles, keep moving.
Wave 2 is another RNG-heavy section.
The enemies can spawn from either above or below, so you need to react quickly.
The strategy is simple:
Run toward one side.
If you don’t see the enemy appear there:
Immediately move toward the other side.
You’ll need to make this decision five times.
At first, this can feel random and annoying, but after playing a few runs, you’ll start recognizing the spawn timing.
You’ll gradually learn when you should continue toward one side and when it’s better to immediately switch.
The better you become at reading the spawn timing, the less time you’ll lose on this wave.
Wave 3 is probably the easiest wave in the entire Score Attack stage.
You’ll have two circles that you need to use for the rescue objectives.
Instead of running back and forth between them, simply position yourself between both circles.
From there, you can rescue both targets without wasting unnecessary movement.
Don’t overthink this wave.
Get into position, complete both objectives, and move on.
This is where a really good run can start to explode.
You need to defeat 2,000 targets, so having the right skills here can make a massive difference.
If you’re lucky enough to get Red Star on your Deku skill, this is where you can absolutely destroy the wave.
Once you have a strong skill setup, your main job is simple:
Keep running in ONE direction.
Don’t constantly turn around.
Just keep moving and let Deku’s abilities do the work.
Your goal is to maintain consistent movement while your AOE abilities clear enemies around you.
The better your AOE coverage and Deku skill upgrades are, the faster you’ll be able to clear this wave.
If you start constantly changing directions, you can easily lose time without gaining much in return.
The final wave requires you to collect the target clues.
Small boxes will spawn around the stage, and each one contains a purple page.
You need to collect 8 clues.
Your priority here is simple:
Grab them as quickly as possible.
Don’t waste time fighting enemies that you don’t need to fight.
Move directly from one clue box to the next and keep your movement as clean as possible.
Unfortunately, this wave also contains a lot of RNG because the clue boxes can spawn in different locations.
If the boxes spawn close together, you can save a lot of time.
If they’re spread across inconvenient locations, your score can suffer even if you play everything correctly.
So after all of that, what’s the real secret to getting a huge Score Attack score?
Honestly…
RNG.
You can play an almost perfect run and still end up with a worse score because the game simply didn’t give you the right conditions.
You can get unlucky because:
That’s why I wouldn’t get frustrated if your score suddenly drops.
A bad run doesn’t necessarily mean you played badly.
The whole idea behind Score Attack is to keep playing until everything lines up.
You’re looking for that one run where you get:
Good spawns + Good skills + Good movement + Red Star Deku = HUGE SCORE
You might have several mediocre attempts before everything finally comes together.
That’s normal.
The more you play, the better you’ll also become at recognizing the patterns, which means you’ll be able to take advantage of the good RNG when it finally appears.