
If you’re trying to build a strong Gold Rush formation in Clash of Critters, knowing which Tatari to use is only part of the puzzle. You also need to understand Arena Factor, elemental weaknesses, buffs, debuffs, and where you should place your units.
In this guide, I’ll go through the important Tatari abilities, explain how Arena Factor works, cover the Meta and Off-Meta choices, and then look at the different Gold Rush attack and defense formations. I’ll also explain the Element Aura buffs and answer some of the most common questions about building your team.
I’ve tried to keep everything practical, so you can actually use these tips when creating your own Gold Rush or Duneside Arena formations.
Clash of Critters Gold Rush Formation, Tier List & Tatari Ability
Before building your formation, it’s important to understand what Arena Factor actually means and why it matters.
Whenever a skill hits another Tatari, the skill’s base damage is multiplied by an Arena Factor. This factor changes depending on the skill being used and the counter element of the Tatari being attacked.
This is one of the biggest reasons why you shouldn’t simply fill your formation with your strongest Tatari from one element.
Why Arena Factor Matters
Every Tatari has its own elemental weaknesses. Because of that, I strongly recommend bringing around 2 to 4 Tatari from each element when creating your Gold Rush formation.
Having a good elemental spread gives you more opportunities to hit enemy Tatari with favorable Arena Factors. This becomes especially important when you’re trying to maintain a high kill streak.
A formation that looks strong on paper can still perform badly if its elemental coverage is poor.

Tatari Abilities Explained
Next, let’s talk about Tatari abilities. Understanding these abilities is extremely important when you’re creating either a Gold Rush formation or an Arena formation.
Some abilities may look simple at first, but they can make a huge difference when combined with the right Tatari.
Offensive & Debuff Abilities
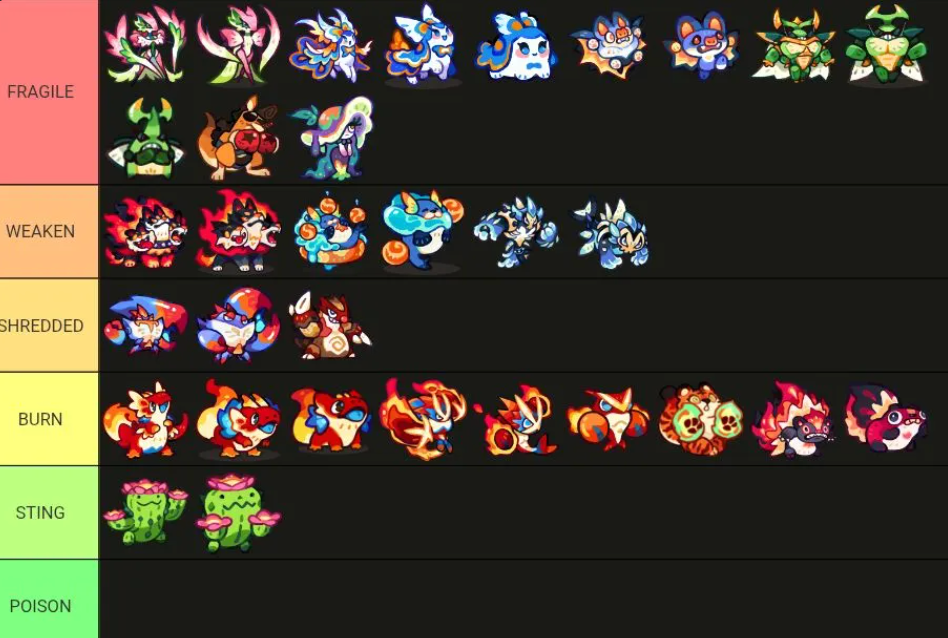
Fragile: Allows you to deal more damage against enemy Tatari. It works regardless of their element.
One important thing to remember is that Fragile doesn’t stack with another Fragile effect with the same name. However, it can stack with other buffs and differently named effects.
Weaken: Causes enemy Tatari to deal less damage to your own Tatari.
The same Weaken ability cannot stack with itself, but it can stack with other debuffs.
Shredded: Works similarly to Fragile by increasing the damage enemies take, but it has a limited count of 8 applications.
Like Fragile, the same Shredded effect doesn’t stack with itself, although it can work together with other buffs and debuffs.
Burn / Sting / Poison: These effects deal increased damage while also continuously damaging the affected enemy over time.
These abilities can be particularly useful when you’re trying to keep pressure on enemy Tatari rather than relying entirely on one big attack.
Crowd Control Abilities
Crowd control, or CC, is another major part of successful formations.
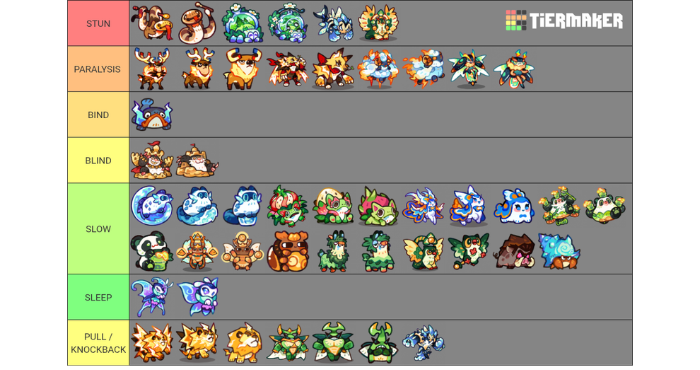
Stun: Prevents enemy Tatari from moving, performing basic attacks, or using skills for a short period.
Paralysis: A variation of Stun that continuously deals damage while preventing the enemy from moving tiles. The important difference is that the affected Tatari can still attack.
Bind: A weaker form of Stun and Paralysis. It only prevents the enemy Tatari from moving.
Blind: Prevents the affected Tatari from dealing damage for a period of time.
Slow: Reduces the movement speed of enemy Tatari, making them move slower than their normal movement speed.
Sleep: Puts the enemy Tatari into a sleeping state where it cannot attack or move. However, Sleep can be broken after the Tatari takes a certain amount of damage.
Pull / Knockback: Pull forces enemy Tatari closer to your own Tatari, while Knockback pushes them away.
These abilities can completely change how a fight plays out, especially when you’re trying to control where enemies move on the board.
Defensive & Buff Abilities
Of course, damage isn’t everything. Some of the most useful Tatari in Gold Rush are valuable because of the defensive buffs they provide.
Shield: Creates a shield based on your Tatari’s HP percentage. Some shields also have additional effects, such as reflecting damage or stunning enemies.
Heal: Restores some of your Tatari’s HP over time.
Damage Reduction: Makes your Tatari more durable by reducing the damage they receive.
ATK / DEF Boost: Allows a Tatari to share a portion of its ATK or DEF stats to improve the attack or defense of other Tatari.
Attack Speed Boost: Increases basic attack speed and skill frequency, allowing your Tatari to attack more quickly and use abilities more often.
Invincible: Makes a Tatari untargetable or immune to attacks and skills for a period of time.
Most of the Tatari that appear regularly in strong Gold Rush formations rely on one or more of these abilities.
Some abilities might seem less impressive when you first look at them, but once you understand how they interact with other Tatari, their value becomes much clearer.
Self-Buffs, Shields & Heals
You might be wondering why Tatari that can only heal, shield, or buff themselves are included when discussing formation abilities.
The reason is simple: even though these Tatari aren’t directly buffing the rest of your team, they can still play a very important role in a successful Gold Rush formation.
Some of these self-buffs make a Tatari significantly harder to kill or allow it to survive long enough to provide value. In some formations, these abilities can be crucial and even irreplaceable.
So don’t automatically ignore a Tatari just because its main defensive ability only affects itself.
About the Ability Tier List
You may notice some Tatari appearing as Tier 1, Tier 2, Tier 3, or Tier 4 in different ability categories.
I can’t always set every Tatari to their exact Tier 4 appearance in the tier-list maker, so for the purpose of this guide, you should generally consider them based on their Tier 3–4 appearance.
This applies to the other Tatari shown throughout the ability tier list as well.
Gold Rush Ultimate Tier List
Now we get to one of the most important parts of the guide: the Gold Rush Ultimate Tier List.
I split the recommendations into two main categories: Meta and Off-Meta.
Gold Rush Tier List Categories
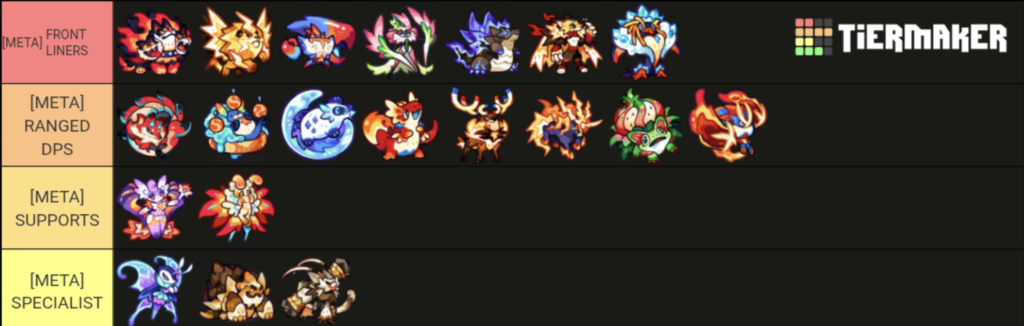
Meta
The Meta tier contains the current top-tier and most frequently used Tatari in the game.
These are the Tatari I would prioritize if your main goal is to build a strong and reliable Gold Rush formation.
If you’re not sure where to spend your resources, this is the list I would start with.
Off-Meta
The Off-Meta tier contains a mixture of newer and older Tatari that still have strong potential.
Some of these Tatari might become much more valuable after future balance changes, so I wouldn’t completely ignore them just because they’re not currently part of the main Meta.
Also, some newer Tatari such as Poakie and Budboo may not appear in the visual tier list yet because they weren’t available in the tier-list maker at the time. However, I would still consider them part of the Off-Meta category.
Gold Rush Meta Formation
Now let’s move on to the part most players are probably waiting for: the Gold Rush Meta Formation.
There isn’t one single formation that will work perfectly against every opponent. Your level, the opponent’s setup, the board, and whether you’re attacking or defending can all affect the result.
That’s why I recommend understanding the idea behind the formations instead of simply copying the positions.
Gold Rush Formation Types: Attack vs. Defense
There are two main types of Gold Rush formations:
- Attack formations
- Defense formations
Both are fairly similar and usually only require small changes, especially when it comes to Tatari placement.
The formations I’m recommending here are heavily inspired by formations used by other experienced players that have already been tested in real matches. I’ve also made my own adjustments to make them more consistent.
The Ultimate Attack Formation
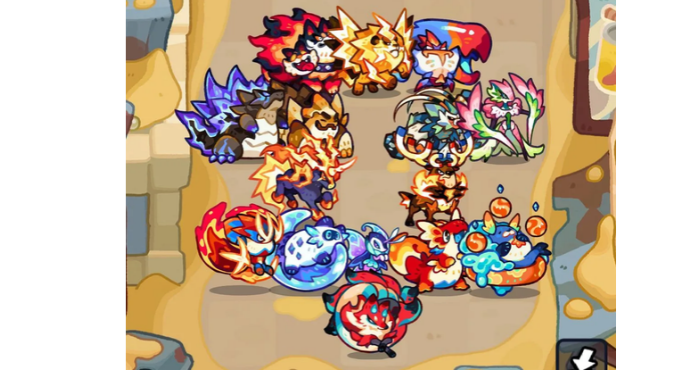
The attack formation is the main offensive setup I’ve been using for a long time.
Its biggest strength is spreading damage across the board while keeping each lane properly covered. Different elements support each other, giving your attacks a better chance of connecting with the right targets.
This works particularly well when you’re actively fighting other players.
When Should You Use Attack Formation?
Attack formations can work very well for beginner, mid-level, and high-level players.
A lot of players in Regular or Tournament Gold Rush also use offensive formations, so you can often get better kill streaks when attacking other offensive setups.
The downside is that you may use more energy cans, especially when you’re attacking a defensive formation.
Still, I recommend trying this setup yourself and seeing how it performs with your current Tatari.
The Ultimate Defensive Formations
I use two main defensive formation types.
These can be mirrored or adjusted depending on what you’re facing, whether you’re playing Gold Rush or Duneside Arena.
The main purpose of these formations is to make it harder for opponents to get kills while you’re not actively playing.
A lot of the ideas behind these defensive formations are influenced by how the Dojo stages work, since lane control and survival are extremely important there.
You can also experiment with Off-Meta Tatari in these formations. I personally think that’s one of the fun parts of building a defensive team — you don’t always have to copy the exact Meta setup.
When Should You Use Defensive Formation?
Defensive formations work particularly well for Pioneer/Veteran Regular or Tournament Gold Rush.
Once you reach around the 1800+ level range, many players are more focused on minimizing enemy kills. The goal is to protect their team and league tiles as efficiently as possible while still securing a large number of kills when attacking other defensive tiles.
If you’re frequently getting attacked while offline, a strong defensive setup can make a noticeable difference.
Element Aura Buffs
The final major part of building a Gold Rush formation is understanding Element Aura Buffs.
Each Element Aura provides a different bonus to your team.
Water Aura
Water Aura heals your entire team over time.
This gives your Tatari additional sustain and can help your team survive longer during extended fights.
Fire Aura
Fire Aura provides a Damage Boost.
This helps your Tatari deal more damage and can allow you to take down enemy units faster.
Lightning Aura
Lightning Aura provides an Attack Speed Boost.
It helps reduce the effective time between attacks and skill usage, allowing your Tatari to cast abilities more frequently and deal faster damage.
Grass Aura
Grass Aura provides additional Health.
It increases your team’s overall HP based on their HP percentage, making your Tatari more durable.
Earth / Rock Aura
Earth / Rock Aura increases Defense.
This makes your Tatari harder to take down and is especially useful when you’re building a defensive formation.
Quick Tip
Mixing Tatari elements is still extremely important because you need to cover elemental weaknesses and take advantage of Arena Factors.
However, if you can align your main Tatari with your core Aura type, you can maximize the stat bonuses your team receives.
In other words, don’t just think about which Tatari is strongest individually. Think about how the entire team works together.
Gold Rush Formation FAQ
Does the Gold Rush formation work from Tier 1 to Tier 2?
Absolutely.
The general formation concepts still work at lower tiers because most Tatari don’t change dramatically during the early stages.
You might not get the full power of a higher-tier Tatari, but the positioning and elemental coverage principles still apply.
Which Tatari Should I Evolve First for Gold Rush?
I recommend prioritizing the current Meta tier list.
Start by leveling your most important Meta Tatari from T1 toward T3 or T4 depending on your resources.
For tanks and guardians, I recommend having at least five of each element developed to around T2–T3 while also working on your DPS, support, and specialist Tatari.
This gives you a much stronger foundation instead of putting all your resources into just one element.
Should I Also Evolve Off-Meta Tatari?
That depends on what you play outside of Gold Rush.
Off-Meta Tatari can still be extremely useful in other content such as Horde, story stages, and Cozy farming.
So even if a Tatari isn’t part of the current Gold Rush Meta, it doesn’t automatically mean upgrading it is a waste.
I would simply prioritize Meta Tatari first and then invest in Off-Meta options when you have the resources.
How Can I Get More Kills in Gold Rush?
Prioritizing the Meta tier list should gradually increase your kill count as you evolve your Tatari one by one.
However, your kill count isn’t determined by your formation alone.
It also depends heavily on which board you’re playing on:
- Beginner
- Mid
- High
- Pioneer
As you move to higher-level boards, your average number of kills will generally decrease because the opponents become stronger.
That’s why choosing the right board for your current team is just as important as the formation itself.
How Do I Evolve My Tatari Faster?
The best thing you can do is carefully check the evolution requirements for each Tatari.
Make sure you explore the different functions of the game and read the descriptions properly. Some evolution requirements aren’t immediately obvious, and knowing exactly what you need beforehand can save you a lot of time.
Should I Use Attack or Defense Formation?
Attack formations are generally better when your main goal is maximizing kill count, although they can cost more energy, especially against defensive formations.
Defense formations are better when you want to minimize incoming kills and conserve energy.
Your own level also matters, so I wouldn’t say that one formation is universally better than the other.
Does the Gold Rush Ultimate Formation Work in Arena?
Yes.
Gold Rush and Arena have the same basic PvP essence because both involve a 1v1 battle between players.
Because of that, the same principles around elemental coverage, abilities, positioning, and formation building can also be applied to Arena.
You may still need to make small adjustments depending on your opponent.
What’s Better: Attack or Defense?
If you’re higher level than most of the Trainers on your board, using both Attack and Defense formations can benefit you.
You can use an offensive formation when attacking and switch to a defensive setup when you’re protecting your own tiles.
If you’re lower level than the top Trainers on your board, I would generally favor a Defensive Formation.
This gives you a better chance of minimizing the number of kills your opponents get against you.
I’m a Beginner or Mid-Level Player. What Can I Use Instead of Meta Tatari?
If you don’t have all of the Meta Tatari yet, don’t worry.
You can either continue building the Meta list gradually or use lower-tier Tatari as replacements while your main units are still unevolved.
There is nothing wrong with using what you currently have. The important thing is to keep improving your elemental coverage and gradually replace weaker units as you obtain better Tatari.
Why Should I Follow This Guide?
Honestly, because I enjoy helping players.
Whether you’re completely new to Clash of Critters or you’ve already been playing for a long time, I want this guide to make Gold Rush easier to understand.
You don’t have to follow every recommendation exactly. Use the information here as a starting point, experiment with your own formations, and see what works best for your account.