If you’re playing Horde Invasion in Clash of Critters, choosing the right chip at the right wave can make a huge difference. Some chips look amazing when you first see them, but their value can drop dramatically if you pick them too late. On the other hand, a few chips can completely change the strength of your run when you take them at the right time.
In this guide, I’ll go through the Horde Invasion chip tier list, explain how I personally look at chip strength, and cover some of the most important chip-specific tips. I’ll also explain which early-game chips you should avoid taking on later waves and why timing matters so much.
The tier list assumes that you’re taking each chip on the expected wave where it performs best. This is extremely important because a chip that deserves an S or A rating early in the run can easily become a D or even F-tier choice if you take it on Wave 10 or Wave 15.
Clash of Critters Horde Invasion Chips Tier List – Best Chips
Before getting into the individual chips, here are the tier-list images for the different chip rarities.
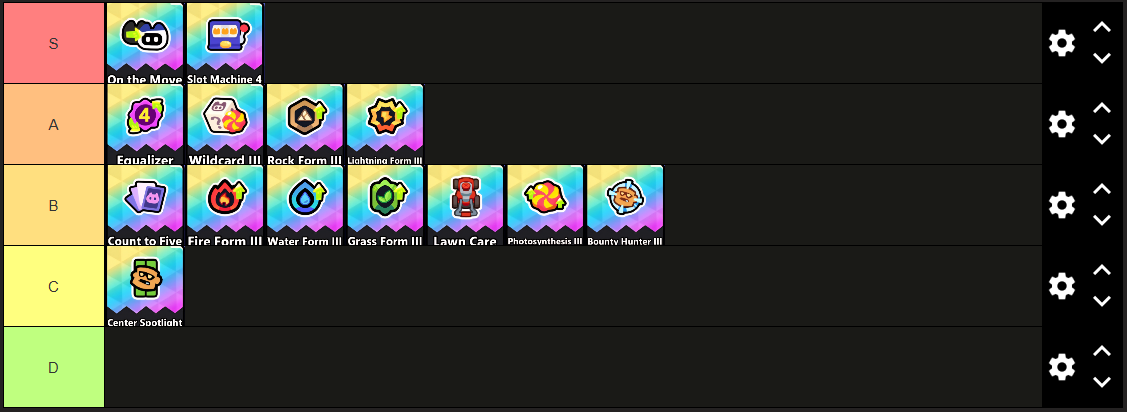
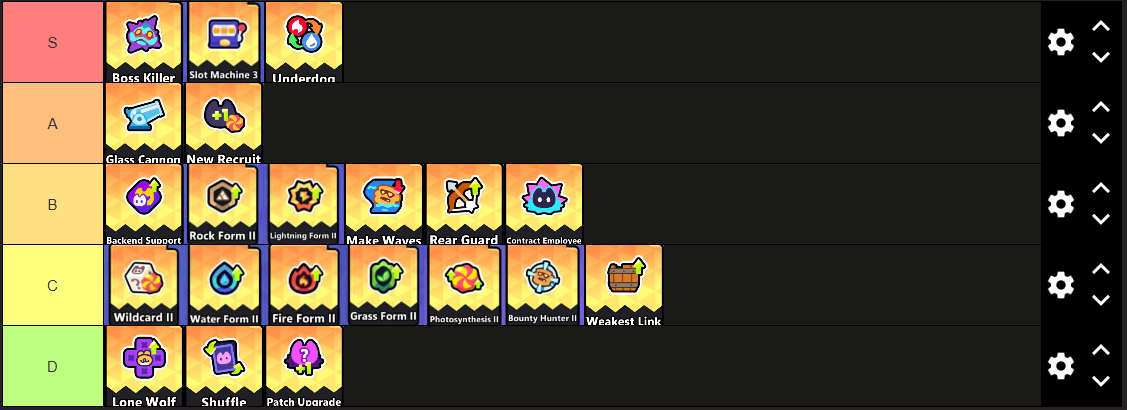
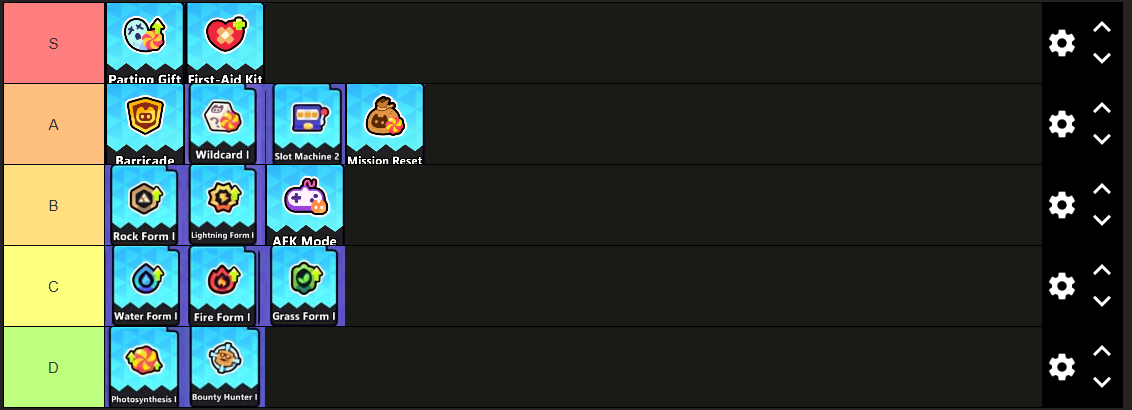
These rankings are based on the expected value of each chip during a run rather than simply looking at the effect written on the chip.
How I Evaluate Horde Invasion Chips
There are a couple of things that I think are important to understand before looking at the rankings.
First, the cost of increasing your Energizer level goes:
100 → 100 → 120 → 120 → 150 → 150 → 180
At the same time, the buffs provided by those levels go:
100 → 150 → 160 + skill → 200 → 220 + skill → 270 → 300 + skill
This means that every Energizer investment doesn’t provide the same value. Some upgrades give you a much bigger jump than others, so you need to consider what you’re actually getting for the resources you’re spending.
Economy vs. Combat Chips
There are basically two types of chips:
- Economy chips
- Combat chips
Both types ultimately increase your combat strength, but they do it in different ways.
Economy chips increase your Energizer count. You then use those additional Energizers to increase the levels of your Tatari and combat chips.
Combat chips, on the other hand, directly increase the combat power of your team.
This makes economy chips a little harder to compare with combat chips because their value isn’t always immediately visible.
Understanding Energizer Value
One useful way to compare different chips is to think about their approximate Energizer value.
For economy chips, this is fairly easy.
For example, Slot Machine 4 can give you four Tatari levels. Depending on the level you’re getting, that can be worth roughly 400–720 Energizers.
Combat chips are harder to quantify, but you can still estimate their value.
For example, Rock Form 3 increases Rock damage by 40%.
With the current meta generally using around 2–3 tanks, Ashlarva, Punchimp, 1–2 DPS, and 3–4 supports, Rock Form can represent a significant portion of your overall DPS.
If you rush Punchimp to Level 7, Rock Form 3 can roughly represent a 16–24% increase in total DPS, depending on your exact team.
Once you look at chips this way, comparing something like Rock Form 3 against Slot Machine 4 becomes much easier.
Slot Machine 4 can increase four units by around 22–50%, depending on the buffs from the levels involved, which works out to roughly an 8.8–20% total stat increase.
This doesn’t mean one chip is automatically better in every situation. It simply gives you a better way to understand the relative value of each chip.
Chip Tier List Images
[PASTE RAINBOW CHIP TIER LIST IMAGE HERE — ORIGINAL RAINBOW TIER LIST]
[PASTE GOLD CHIP TIER LIST IMAGE HERE — ORIGINAL GOLD TIER LIST]
[PASTE BLUE CHIP TIER LIST IMAGE HERE — ORIGINAL BLUE TIER LIST]
I recommend keeping these images nearby while playing because the value of a chip can change depending on which wave you’re currently on.
Important Chip Usage Tips
Now let’s get into some of the chips that deserve extra explanation.
Some of these aren’t necessarily difficult to understand, but their value depends heavily on how you use them.
On the Move
On the Move is probably one of the most annoying chips in the game to use correctly.
However, the reward is worth it.
It gives 20% Attack and 20% Attack Speed. Since these bonuses multiply together, you’re effectively looking at:
1.2 × 1.2 = 1.44
That’s roughly a 44% increase in DPS.
From my experience, when I take this chip and use it correctly, I can often get around 40–80 more kills than I normally would.
So while the chip can be frustrating to utilize, don’t underestimate it.
Slot Machine
Slot Machine is intended to be used when you have 10 Tatari deployed.
This is extremely important.
If you use Slot Machine before reaching 10 deployed Tatari, you risk messing up your team composition.
Personally, I would rather wait until I have the correct number of Tatari deployed than take the chip early and potentially ruin the rest of the run.
Photosynthesis and Bounty Hunter
Photosynthesis and Bounty Hunter can provide a decent amount of Energizers, but there’s an important catch.
Sometimes you need to level them all the way to Level 8.
That can be a pretty poor use of resources because you’re spending 180 Energizers just to increase the effect from 300% to 330%.
That’s only a relative 10% increase for a very expensive upgrade.
So don’t automatically assume that pushing these chips to the highest level is always the correct play.
Underdog
Underdog becomes especially useful when the current meta is focused around only 1–2 main DPS Tatari.
If most of your damage is concentrated into a small number of units, Underdog can provide much more value than it might initially appear to.
This is one of those chips where understanding the current meta and your own team composition really matters.
New Recruit
New Recruit can be useful because it allows you to take another support Tatari.
That can give your formation additional utility without forcing you to sacrifice an important part of your core setup.
However, if you use New Recruit to take another tank or DPS that ends up getting stuck at a low level, the value isn’t nearly as good.
So for me, the main appeal is using it to add another support.
Make Waves
Make Waves works particularly well when combined with Zappur.
If you’re building around Zappur, this is a combination worth keeping in mind when you’re choosing your chips.
Rear Guard
Rear Guard can be useful, but there’s one major downside: it can force you into a worse positioning setup.
Positioning is already extremely important in Horde Invasion, so you don’t want to take a chip that looks good on paper only to discover that it has messed up the way your formation works.
Always think about where your Tatari will end up before committing to it.
Wildcard
The strength of Wildcard depends heavily on the chip tier you’re getting.
It also depends on how many negative chips are included in the available options.
This is why Wildcard 2 can be particularly bad.
A large number of Gold chips can potentially interfere with your team composition and, in the worst case, completely ruin the run.
So don’t take Wildcard simply because it gives you more choices. The quality of those choices matters much more.
Shuffle and Patch Upgrade
Shuffle and Patch Upgrade can also be dangerous depending on your current formation.
They have the potential to completely mess up your composition, which can eventually cost you the entire run.
If your current setup is working extremely well, I would think carefully before taking something that can randomly disrupt it